Showing posts with label main recipe. Show all posts

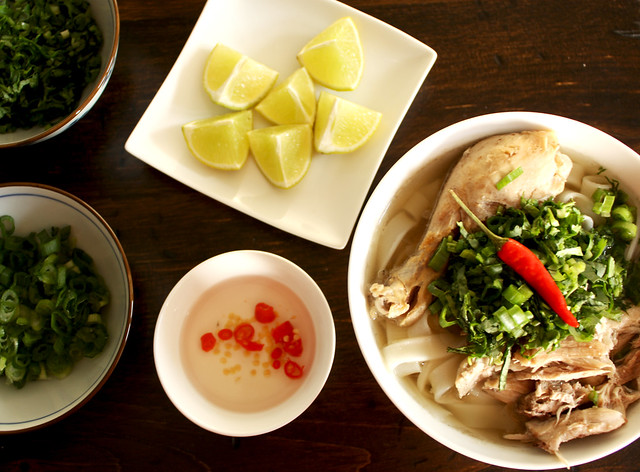
Recipe: Vietnamese Chicken Noodle Soup (Pho Ga)

Pho Ga (Chicken Noodle Soup)

My mom LOVES to buy whole chickens for me. The only problem is that she is a bit excessive with it. She will out of nowhere call me up, tell me she is dropping off a chicken for me, and then all of a sudden, 3 whole chickens will show up at my door. But, it doesn't stop there. The next day, another chicken will show up. And the next day, another chicken is dropped off. And it won't stop until you firmly tell her that enough is enough.

As much as I should be grateful for all of the gifted chickens, I kind of get to a point where I just don't have enough space to store them.

Needless to say, my freezer is always full of whole chickens, which is perfect for making broth. This Vietnamese Chicken Noodle Soup (pho ga) recipe is one that my mom gave me. While it seems complicated to make, it is in fact very easy. It does take some time to make, but you can pretty much go on auto-pilot once you have everything cooking in the pot.
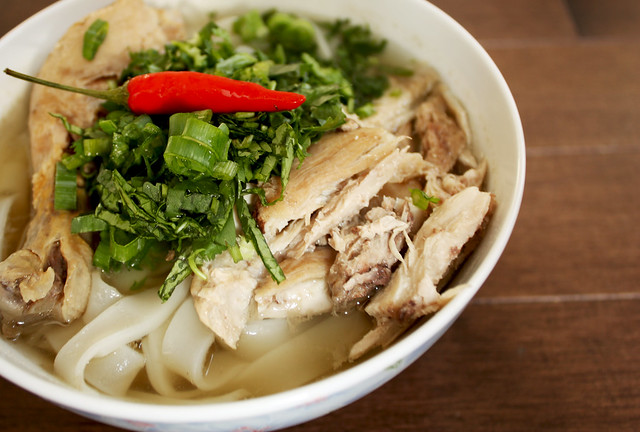
Pho Ga

Vietnamese Chicken Noodle Soup (Pho Ga)
- flat rice noodles, fresh or dried
Stock
- 1 whole free-range chicken (4-5 lbs), skin and excess fat removed
- water
- 1/4 tsp of salt
- 5-7 Tbsp fish sauce
- 3 star anise
- 4-5 large onions, peeled and cut in half
- 2-3 pieces of ginger, approx 2 inches long with skin peeled

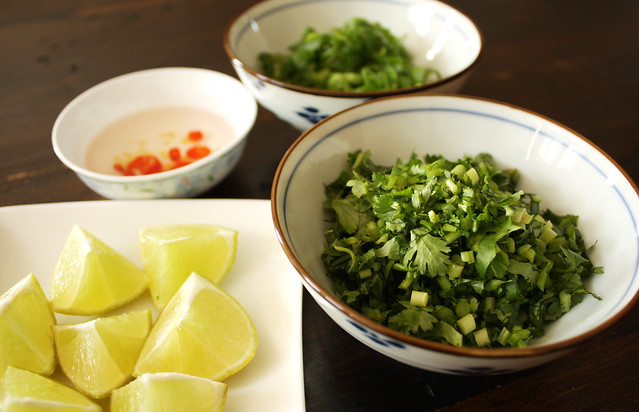
Garnish (All optional)
- fresh cilantro, finely chopped
- fresh green onion, finely chopped
- white vinegar with chopped birds eye chilli
- fresh white onion, cut into thin slices
- birds eye chilli
- fresh lime, cut into small wedges
- white pepper
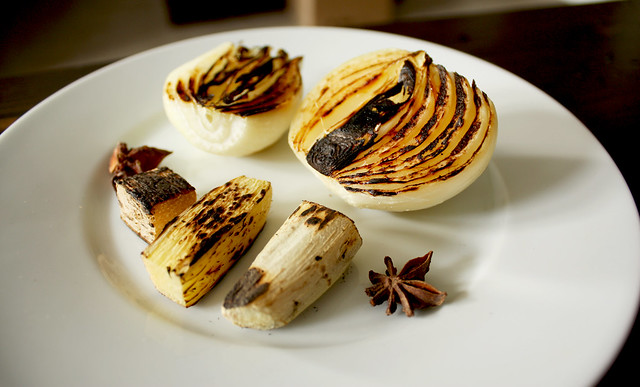
Charred Onion and Ginger

Garnish for Pho

Method
1. Char the onions and ginger on a bbq grill or stove top (on high heat) until all sides are charred. Approximately 1-3 minutes per side. Use tongs to rotate.

2. In a large pot (5.6L), fill 3/4 of the pot with water. Add the chicken, salt, onions, ginger and star anise, and bring to a boil. Turn the heat down to low and let it simmer for an hour. Add the fish sauce and let it simmer for another 1-2 hours. Technically, you are done once the chicken is cooked but the longer the better. I like to simmer my broth for a total of 3 hours. Add water as needed (the broth tends to evaporate while simmering).
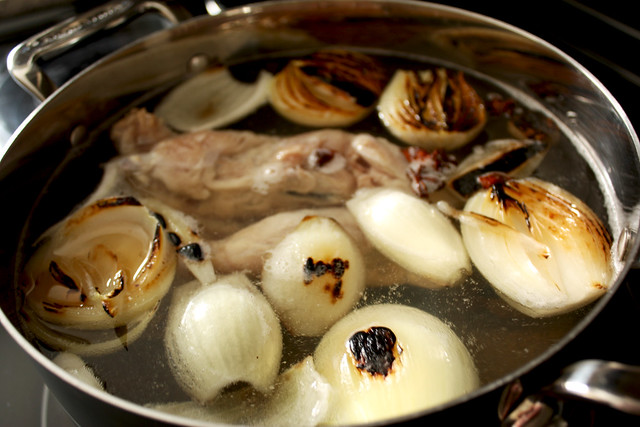
Chicken Soup

3. Now you are ready to construct the soup and noodles. In a separate pot, cook the rice vermicelli noodles according to package instructions. If you are using dried rice vermicelli, it is best to soak the noodles in a large bowl of luke warm water for a few hours before cooking. This shortens the cooking time significantly.

4. Drain the noodles and place in a large soup bowl. Add hot broth over top of the noodles. Add chicken pieces and your garnishes of choice. Serve hot with a large soup spoon and chopsticks.

Recipe: Dairy Free Parsley Pesto

Parsley Pesto

Not everyone loves Basil. For those who don't, why deprive them of pesto? It's such a fresh and easy way to enjoy noodles and it requires absolutely no cooking!

I decided to try a parsley pesto to shake things up. Cheese seemed to be too heavy with parsley, so I cut that out entirely and added lemon juice. We've been substituting regular pasta for buckwheat noodles lately, and this pesto goes great with buckwheat. Give it a try if you're looking to do something a little different for your next meal.

This pesto recipe is good for approximately 300-350g of noodles.

Parsley Leaves

Parsley Pesto
- 4 1/2 cups of fresh Italian parsley, roughly chopped
- 1/4 cup of pine nuts, toasted
- 2 cloves of garlic
- 3 Tbsp extra virgin olive oil
- 1/2 tsp salt
- 2 Tbsp of lemon juice

Method
1. Combine all of the ingredients into a food processor and blend until it reaches a smooth consistency. Toss with hot pasta or buckwheat noodles and mix until evenly coated.

This pesto is best when used immediately. If you decide to keep it, store it in the refrigerator for up to 3 days.

Parsley Pesto with Buckwheat Noodles

Recipe: Soy Ginger Buckwheat Noodle Salad

Buckwheat Noodle Salad

Buckwheat is a great food to incorporate into your diet. It is a good source of protein, anti-oxidants, iron and zinc. People with high cholesterol or high blood pressure can benefit from buckwheat as it has been linked to lowering the risk of both conditions.

Contrary to popular belief, buckwheat is not a grain, but is in fact a plant that is related to rhubarb and sorrel.

This soy ginger buckwheat noodle salad is a great way to enjoy buckwheat this summer...especially when served chilled!

This recipe yields 4 servings.

Soy Ginger Buckwheat Noodle Salad
- 8oz dried buckwheat noodles
- 1 carrot, julienned
- 1/2 red pepper, seeded and julienned
- 2 scallions, sliced into thin strips
- 250 grams or 2 cups of frozen edamame in shell

For the Sauce
- 3 Tbsp sweet soy sauce
- 3 Tbsp water
- 1 tsp of palm sugar
- 1/4 tsp of sesame oil
- 2 1/2 tsp of sherry vinegar
- 1 small nob of ginger (approx 1inch x 1inch), grated with juice
- 1 red birds eye chile, finely chopped  (optional)

Method
1. Cook buckwheat noodles according to package instructions and then rinse with cold water.  

2. Cook the edamame as per package instructions. Discard the shell and set aside.  

3. Combine all of the ingredients for the sauce in a bowl and mix well. In another bowl, combine the buckwheat noodles, edamame, carrot, red pepper and scallions. Drizzle the sauce over top of the noodle salad and mix until sauce is evenly distributed. Serve immediately or serve chilled.

Buckwheat Noodle Salad

Recipe: Sweet and Sour Pineapple Shrimp

Sweet and Sour Shrimp

This dish is so mind blowingly simple, you may just laugh. At least I did when I ate this dish and asked for the recipe. I asked at least 3 times, "That's it!? You don't put anything else in the sauce? Are you sure!?"

What makes the sauce sweet and sour is the ketchup. Yes, just plain 'ol ketchup. The tomato concentrate combined with the corn syrup and vinegar makes this a ready to use sauce for Asian dishes. Of all the ketchups on the market, Heinz ketchup has the sweet and sour proportions just right. Other ketchups seem to be either too sweet or not enough.

Sweet and Sour Pineapple Shrimp
- 20 large shrimp, de-shelled but with the shell still on the tip of the tail
- 1 cup of pineapple, cut into 1 inch pieces
- 1/2 green pepper, cut into 1.5 inch pieces
- 1 large onion, sliced into 1/4 inch slices
- 1 garlic clove, finely chopped
- 6 Tablespoons of Heinz ketchup
- 2 tsp of corn starch
- Extra virgin olive oil
- salt and pepper to taste

Method
1. If you are using frozen shrimp, simply place the shrimp in a bowl of water for 15 minutes and then de-shell. Mix the shrimp and corn starch until evenly coated. Set aside.

2. Once the onion is sliced, separate each layer by hand so that they become curved strips. In an oiled pan, on high heat, cook the onions and garlic for 2 minutes. Add the shrimp, and stir fry until 3/4 of the way cooked (approximately 3 minutes).

3. Turn the heat down to medium heat. Add the ketchup, green pepper and pineapple, and stir fry until the shrimp is completely cooked (approximately 2 minutes). Add salt and pepper to taste. Serve hot.

If you dont mind the work when eating, you can keep the shell on the shrimp to hold in more flavor. For a saucier dish, simply add more ketchup.

Sweet and Sour Shrimp

Recipe: Yellow Thai Chicken Curry with Potatoes (Gang Garee Gai)

Thai Yellow Curry

Yellow Thai chicken curry, seen as Gang Garee Gai or Kaeng Kari on English menus, is one of the most fragrant and hearty curries in Thai cuisine.

The essence of making Thai curries is to heat the thick creamy part of the coconut milk until the oil and milk separates, and then frying it with curry paste until it becomes fragrant. If you get this part right, the rest is simple. If the coconut milk does not split, it may be because emulsifiers were added to it. If this is the case, just fry the curry paste with coconut milk until it is fragrant. If you cook the curry long enough, the coconut milk will eventually split.

If you are not making your own curry paste, make sure you buy a good quality one, as this will make all the difference. A paste made in Thailand is your best bet. The Mae Ploy or Mae Sri brands are preferred.

Yellow curry paste is a combination of lemon grass, garlic, shallot, galangal, dried red chilli, corriander seed, kaffir lime peel, cumin, cinnamon, turmeric, and cardamom.

Yellow Thai Chicken Curry with Potatoes (Gang Garee Gai)
- 250mL - 400mL of coconut milk (I used 250mL. Using a bit more will make it creamier)
- 2 Tbsp yellow curry paste
- 1 pound of chicken
- 1 large onion, cut into 4 wedges
- 4 medium potatoes, peeled and cut into 2 inch pieces
- 2 cups of water
- 4-5 Tbsp fish sauce (start with 4 and add another if you want more taste)
- 1 tsp palm sugar

Method
1. In a large pot, heat the thick creamy part of the coconut milk (the part that rises to the top) until the oil and milk separates. Add the curry paste and fry until fragrant. Add in the rest of the coconut milk and chicken and cook for 1 minute. Add water, fish sauce and onions and simmer until the chicken is cooked. If using chicken thigh or legs, cooking time is approx 30 minutes. If using chicken breast only, cooking time will be slightly shorter.

2. Add the potatoes and simmer until potatoes are cooked, approximately 15 - 20 minutes. Stir in the palm sugar and mix well. Serve hot with Jasmine rice.

Recipe: Persian Chicken and Prune Stew (Khoresh Aloo)

Persian Prune Stew (Khoresh Aloo)

Persians have mastered the art of combining meat with fruit. Coming from someone who never really cared for the two together, I can tell you that Persians do it well and this dish is a prime example.

If you're squirming from the sound of prunes and chicken in stew form, let me try to describe it to you before you decide you're gonna hate it. The base is sweet, tangy and almost candy like. The chicken combined with the slow cooked onions, and some salt + pepper provide the savory elements needed to give it the sweet/salty phenomenon (but more on the sweet side). Serve this stew on a bed of fluffy basmati rice and you've got something that will satisfy your tastebuds in a totally different way.

This recipe calls for pomegranate paste, which is a thick molasses-like paste made of pomegranate concentrate. You can find this at your local Persian grocery/specialty store.

Persian Chicken and Prune Stew (Khoresh Aloo)
- 2 cups of prunes
- 1-2 chicken breasts, cut into 2.5 inch strips (depends on how much meat you want)
- 1 small onion, finely chopped
- 2 cups of water
- 2 Tbsp of pomegranate paste
- extra virgin olive oil
- salt and pepper to taste

Method
1. In an oiled pan, saute the onions until translucent (about 2-3 minutes). Add the  chicken and saute for 3 minutes until partially cooked and lightly brown on the outside.

2. Add the water and prunes. Bring the water to a boil and then simmer for 30 minutes, covered with the lid on. Add more water part way through if necessary. If the heat is too high, the water may evaporate.

3. While simmering, uncover the stew and with a spatula, mash up 1/4 of the prunes so that it helps form a thick sauce. Add 2 Tbsp of pomegranate sauce, salt and pepper to taste, and mix well. Turn off the heat and serve hot.

You can use any type of chicken you want. Feel free to use all dark meat or mix it with both white and dark. If you prefer a more meaty stew, go ahead and add more chicken to the recipe.

Recipe: Carrot and Zucchini Quinoa Patties

Quinoa Patties

Quinoa (pronounced keen-wah) is a good option if you are looking for protein alternatives. It is also gluten-free which is great for the celiac disease sufferers out there. In addition to it being high in protein, quinoa is a good source of fiber, magnesium and iron.

One way to eat quinoa is in burger form. Adding grated carrot and zucchini adds moisture to the patties, and the touch of cinnamon and cayenne is the secret to why these patties taste so good. If you're looking for a sauce to go with these, a spicy salsa will pair nicely.

This recipes makes 16 patties.

Carrot and Zucchini Quinoa Patties
- 6 cups of cooked quinoa (approx 1 3/4 - 2 cups of uncooked quinoa makes 6 cups cooked)
- 3 scallions, finely chopped
- 1 medium carrot, peeled and grated
- 1 medium zucchini, grated
- 2 cups panko bread crumbs
- 3/4 cup of cheese (any kind you like)
- 4 eggs
- 1/2 cup fresh Italian parsley, finely chopped
- 1/8 tsp of cinnamon
- 1/8 tsp of cayenne pepper
- 1/2 + 1/8 tsp of salt
- extra virgin olive oil

Method
1. Cook the quinoa as per package instructions. Mix all of the ingredients except for the eggs until evenly distributed. In a separate bowl, beat the eggs and then add it to the quinoa mixture. Mix well.

2. With your hands make 2 inch patties, making sure the quinoa is tightly packed. In an oiled pan over medium-high heat, pan fry each side for 3-4 minutes or until golden brown.

Quinoa Patties

Recipe: Lebanese Beef and Potato Stew

Lebanese Beef and Potato Stew

This is an authentic Lebanese recipe that will hit the spot if you're in the mood for something stew-y and warm. This stew can be eaten on its own or in true Lebanese style, with pita bread. This recipe calls for allspice and cinnamon, which adds a nice subtle spicy taste.

Beware of the imitation allspice that is sold in some grocery stores. The real stuff is a dried unripe fruit from the Pimenta dioica tree native to Mexico and Central America, and not a mix of cinnamon, nutmeg and cloves.

The name allspice was coined in the 17th century because the taste resembled the combination of cinnamon, nutmeg and cloves.

This recipe yields 4-6 large servings.

Lebanese Beef and Potato Stew
- 1 large onion, diced
- 0.5kg ground beef
- 5 small potatoes, peeled and cut in quarters
- 4 Chinese eggplants, peeled and cut in quarters
- 2 hot house tomatoes, chopped
- 4 carrots, peeled and cut in 2 inch pieces
- 1/3 cup of basmati rice
- 3 Tbsp of tomato paste
- 4 cups of water
- 1/8 - 1/4 tsp all spice (depends on your taste)
- 2 large pinches of cinnamon
- salt + pepper to taste
- extra virgin olive oil

Method
1. Sprinkle the eggplant with salt and let it sit until it starts to release water. Approx 5-15 minutes. Pat the eggplant dry with a paper towel. This gets rid of the bitter taste in the eggplant. In an oiled pan, pan fry the eggplant until soft.

2. In an oiled casserole pot, saute the onions until translucent (approx 3 minutes). Add the ground beef and saute until the beef is 3/4 of the way cooked.  Add the potatoes and carrots and saute for another 3-5 minutes to blend the flavors.

3. Add water, tomato paste, tomatoes, all spice, cinnamon, salt and pepper and simmer for 20 minutes. Add the rice stir well and then lay the eggplant softly into the stew. Simmer for another 25 minutes. Once the eggplant is added, do not stir the pot too much as it will break the eggplant.

4. If you find the stew is not watery enough, add more water. Season with more salt and pepper if needed. Serve hot with bread or rice.

The Persian Banh Mi

Kookoo Sabzi Sandwich

I'd like to introduce you to the kookoo sabzi sandwich, AKA 'The Persian Banh Mi'.

A banh mi sandwich is a Vietnamese sub that is served in a French baguette and filled with meats, fresh veggies, pickled veggies and different spreads like butter, mayo and pork pate.

Although very little similarities between a Vietnamese banh mi and the kookoo sabzi sandwich, this sandwich totally screams Persian Banh Mi. Mainly because it is served in an elongated shaped bread with a standard set of condiments.

This really is a delicious sandwich and healthy too! Here is how you put it together.

1. Make the kookoo sabzi.

2. Grab a hoagie bun and slice it down the middle.

3. Spread labneh on the bun, put kookoo sabzi in between and add condiments like tomatoes, pickles and hot peppers.

Noosh-e-jan!

Condiments

Kookoo Sabzi (Persian Green Herb Omelet)

Kookoo Sabzi

Ok, so this is not a freaky Halloween post. This is a really healthy Persian omelet that is packed with tons of good stuff, and also fun to say! Kookoo. Kookoo. Kookoo.

When in need of something healthy and substantial, this is a great dish that can be eaten throughout the week. It is good as lunch or dinner. Although not very Persian, you can also mix up the greens and use whatever is in the fridge. In the summer, go ahead and add the fresh mint leaves from your garden. If you're in a spinach mood, throw that in. Even if you have salad mix that is about to expire, feel free to throw that in too.

The original Persian style kookoo sabzi is definitely the tastiest. Fenugreek is listed as optional in this recipe because it is both an acquired taste and hard to find in some parts of the world. Some recipes also call for barberries or walnuts to add more taste and variety to this dish.

This recipe yields 8 servings.

Kookoo Sabzi
- 5 large eggs
- 2 cups of coriander, roughly chopped
- 2 cups of green onion, roughly chopped
- 1 cup of curly parsley, roughly chopped
- 1 cup of Italian parsley, roughly chopped
- 1 cup of dill, roughly chopped
- 1 Tbsp of dried Fenugreek (optional)
- 1/8 tsp black pepper
- 1/4 tsp salt
- 1 Tbsp all purpose flour.
- extra virgin olive oil

Method
1. Pre-heat the oven to 350F/180C. In a food processor, combine the eggs and all of the herbs and pulse until all of the vegetables have been finely chopped (approximately 30 seconds to 1 minute). If you prefer the herbs to be chunkier, skip the food processor and leave the herbs roughly chopped and just mix the herbs with the eggs in a bowl with a fork.

2. Pour the egg mixture into a bowl. Add salt, pepper and flour and mix well. The flour will bind the omelet.

Kookoo Sabzi

3. Generously oil an 8"x8" baking dish and bake for 10 minutes. Take the dish out of the oven and pour the egg mixture into the baking dish. Bake for 20 minutes. Take it out and lightly brush the surface with olive oil. Bake for another 10 minutes.

4. Remove from the oven and allow the kookoo (omelet) to cool. Remove from the baking dish (simply flip it upside down) and cut into wedges. Serve cool or warm.

Kookoo is normally baked in a round dish or pan fried in a round pan and then cut into triangular slices like a pizza. However, if you want to make a kookoo sabzi sandwich, then rectangular wedges are much easier to work with in a sandwich.

If you don't feel like a sandwich, you can simply dip this in a yogurt sauce and have it with pita bread, rice, or eat it plain. There really are no rules. You can eat this however you want.

Kookoo Sabzi

Black Bean and Tomato Soup

Black Bean Soup

At home, CK and I are trying to eat more organic foods and less meat these days. I eat out a lot when I'm travelling so when I'm home, I try to eat really healthy to balance the fat, grease and salt I put into my body when I'm away.

Ok, so I don't eat super healthy right when I get home. Because I'm so used to eating out when I'm on the road, I have to ween myself off of the excessive eating and drinking. I have what I call my 'weening period'. Doesn't matter what day of the week I come home, I get to eat what I want, as much as I want (like driving to a late night bakery after stuffing my face at a dinner party, and ordering every type of croissant available for dessert, and then eating it in the car because I can't wait for the 5 minute drive home - yep, I'm sexy and I know it!) for the rest of the week, AND THEN I start my healthy eating and regular exercise.

This delicious black bean soup is my recent healthy concoction packed with protein, nutrients...and gas! Just blame it on the dog if you're eating this with other people.

Most of the ingredients in my recipe were organic, but I didn't list it as such. It's your choice

This recipe yields 6-8 servings.

Black Bean and Tomato Soup
- 4 (19 fl. oz, 540mL) cans of black bean
- 1 ( 28 fl. oz, 794mL) can of diced tomatoes
- 3 carrots, diced
- 3 stalks of celery, diced
- 1 medium red onion, finely chopped
- 4 cloves of garlic, minced
- 2 cups of vegetable or chicken stock
- 1 tsp of paprika
- 1 tsp of cumin
- 1 tsp of chili powder
- 1 generous cup of cilantro, roughly chopped

Method
1. In a pan, saute the onions and garlic until translucent (about 2-3 minutes). Turn the heat off and set aside.

2. In a food processor, process 2 cans of black beans, the diced tomatoes and some of the sauteed onions and garlic (about 1/4 cup) until smooth.

3. Add the celery and carrots to the remaining garlic and onions to the pan, and continue to saute until the carrots and celery is tender (about 5-8 minutes). Transfer the vegetables into a large pot, along with the processed bean mixture, stock, remaining black beans, paprika, cumin, chili powder, and cilantro and simmer for 15 minutes. Serve hot.

Roasted Vegetable and Spinach Lasagna

Vegetarian Lasagna

Everyone needs a good lasagna recipe in their repertoire. Growing up, my mom tried hard to make a good lasagna, but no matter what she did, it would always turn out soggy. I was always envious of my friends whose moms knew how to make soggy-free lasagna. Well, I finally perfected a recipe, and can now enjoy soggy-free lasagna whenever I want!

Roasted Vegetable and Spinach Lasagna
- 1 (375g, 13oz) package of uncooked oven ready lasagna noodles
- 2 cups of parmesan, mozzarella, and provolone cheese mix
- 2 red peppers, seeded and cut into thick slices (4-6 slices each pepper)
- 16 oz mushrooms
- 475g light ricotta cheese
- 1 medium onion, finely chopped
- 5-6 cloves of garlic, finely chopped
- 1 (156 mL, 5.5 fl oz) can of tomato paste
- 2 300g packages of frozen chopped spinach, thawed with water rung out
- 2 eggs
- 2 zucchinis
- 1 Tbsp dried oregano
- 1 Tbsp dried basil
- 1 tsp dried thyme
- 1 1/2 tsp paprika
- 1 (739mL) jar of roasted red pepper and garlic tomato sauce
- Extra virgin olive oil
- salt and pepper

Method
1. In a small bowl, cut the zucchini in 1/2 inch slices, and lightly coat with olive oil, salt, and pepper.

2. Place the zucchini and red pepper slices on a baking tray and broil low for 25 minutes. Half way through, turn the zucchini and red peppers so that they are evenly cooked on both sides. Let it cool, peel the skin off of the red peppers, and roughly chop the zucchini and red peppers.

3. In a pan, saute the onions and garlic with some olive oil until the onions are translucent. Add the mushrooms, basil, oregano, and thyme and continue to saute until the mushrooms are cooked. Add the tomato sauce, tomato paste, paprika, zucchini, and red peppers and saute for another 10 minutes. Add some water if the mixture is too thick.

4. Pre-heat the oven to 350F/175C. In a bowl, mix the ricotta, eggs, spinach, and a large handful of the cheese mixture. Layer the lasagna: coat the bottom of a 9x13 inch baking dish with the sauce mixture, place the lasagna noodles on top of the sauce until the dish is covered, spread a thin layer of the spinach mixture over top of the noodles, sprinkle the cheese mixture over top, and cover with a layer of the lasagna noodles. Add a layer of the tomato sauce mixture, sprinkle the cheese mixture over top, and cover with a layer of the lasagna noodles. Repeat until the baking dish is full and your ingredients used up. The last layer should be the tomato sauce with some cheese sprinkled over top.

5. Cover with aluminum foil. Bake for 50 minutes. Remove foil and broil high (2-5 minutes) until the cheese on top becomes a golden brown. Let it sit for 8-10 minutes before serving.

Vegetarian Lasagna

Persian Yellow Plum Stew (Khoresh Aloo)

Yellow Plum Stew

This dish is one of my favorite Persian dishes, and is best enjoyed in the summer time. It is a stew made of fresh herbs and yellow plums, all of which taste the best in the summer months.

Persians love their food sour, which is why I call for semi-ripe plums and why I don't have an exact measurement in the recipe. If you prefer your food sweeter, I would suggest either using ripe plums or more sugar. For me, 2 Tablespoons of sugar was good enough.

Yellow Plums

Yellow plums are typically harvested June - Sept, and are about the size of golf balls. They are very sour when unripe, but very sweet with a honey like taste when ripe.

This stew calls for A LOT of fresh herbs. Our local grocery store sells Italian parsley for cheap but that's not always the case depending on where you live. Alternatively, you can grow your own herbs, which is very easy to do.

Parsley

Mint grows like weeds in our garden, so I make a lot of dishes that incorporate mint in the summer time. I'll even stuff them in my sandwiches just because I can!

Mint

This recipe yields 4-6 servings.

Persian Yellow Plum Stew (Khoresh Aloo)
- 25 semi-ripe yellow plums
- 3/4 lbs stewing beef or good quality steak cut in 1 inch cubes
- 1 tsp turmeric
- 8 cups of fresh Italian parsley, loosely packed and finely chopped
- 3 cups of fresh mint , loosely packed and finely chopped
- 1 medium onion, diced
- 1 1/2 cups of water
- salt
- pepper
- 2-4 Tbsp sugar

Method
1. In a lightly oiled pot, saute the onions until translucent. Add in the beef, turmeric and few shakes of salt and pepper, and saute until the beef is 3/4 of the way cooked.

2. Turn the heat down to a simmer. Add in the water, Italian parsley, mint, 1/4 tsp of salt, and simmer for 60 minutes with the lid on. Stir occasionally. Add in the plums and simmer until the plums have cooked and have fallen off the pit (approx 10 minutes). Remove the pits, add sugar, and stir gently. Serve hot with basmati rice.

Yellow Plum Stew

I say to gently stir at the end because Persians like to see chunks of plum in their stew. CK and I like it more on the mushy side, so I probably stirred a bit more than I should have.

This is definitely is not a typical stew, and you need to develop an acquired taste for it. But honestly, get past the fact that you are eating plums for dinner, and embrace it! As I said, it is one of my favorite Persian dishes.

Yellow Plum Stew

Creamy Avocado Pasta

Creamy Avocado Pasta

I know it's been a while since I posted a recipe. The truth is, I've hardly been cooking. And if I do, it is quick, easy peasy stuff. Stuff not worth photographing and writing about. Until now that is...

Life is busy, and when I do have time for myself, I'd rather get out and enjoy the beautiful summer weather we've been getting. Gotta take advantage of it, summer doesn't last long here!

CK and I are lovin this recipe, and the best part is that this is a healthy option that perfectly satisfies that craving for a rich, creamy pasta. I swear it's better than pasta alfredo!

This recipe makes 3 servings.

Creamy Avocado Pasta(Adapted from Oh She Glows)

- 2 small or 1 large ripe Avocado
- 2 cloves of garlic, roughly chopped
- juice of 1/2 lemon
- 1/4 cup fresh basil
- 1/2 tsp of salt
- 2 Tbsp of extra virgin olive oil
- 300g of linguine pasta
- fresh ground pepper
- red pepper flakes

Method
1. Cook the pasta, al dente, as per package instructions.

2. While the pasta is boiling, combine the avocado, garlic, lemon juice, basil, salt, and extra virgin olive oil in a food processor and process until smooth.

3. When the pasta is done, drain in a colander. In a large bowl, while the pasta is still hot, mix the pasta with the avocado sauce until evenly distributed. Garnish with black pepper and/or red pepper flakes. Serve immediately.

Creamy Avocado Pasta

Feta, Tomato and Almond Stuffed Chicken

Feta and Tomato Stuffed Chicken

I've never been a huge fan of chicken. Always found the meat a little boring. I find it doesn't have enough taste to stand on its own, which in my books is bleh. It's rare for me to find a good chicken recipe, and when I do find one, I need to spread the good news!

The flavors from the almond, cheese, and herbs in this recipe really compliment the chicken. What I love most about this dish is that the chicken comes out juicy every time...never dry!

This recipe yields 4 servings.

Feta, Tomato and Almond Stuffed Chicken
- 4 large chicken breasts
- 6 slices of white bread, crust cut off
- 1/4 cup of almonds, crushed
- 90 grams of feta, crumbled
- 2 scallions, roughly chopped, green part only
- 4 sun dried tomatoes, roughly chopped
- salt and pepper
- 2-3 egg whites

Method
1. Pre-heat the oven to 350F/175C. Create a pocket in each chicken breast by slicing the thickest part of each breast lengthwise. Do not slice the breast all the way through. Leave about a 1/2 inch. Sprinkle salt and pepper on the inside and outside of each breast. Set aside.

2. In a food processor, pulse the bread, 1 Tbsp of crushed almonds, some salt + pepper for 30 seconds until even bread crumbs are formed. Place the bread crumbs onto a large plate.

3. In a mixing bowl, combine the feta, sun dried tomatoes, scallions, and the rest of the crushed almonds and mix well with a fork. Place the egg whites onto a large plate.

4. Stuff and bread the chicken breasts. Spoon 1/4 of the feta mixture into the pocket of the breast, cover the entire surface of the chicken breast with egg white, and then roll the breast into the bread crumbs until surface is covered. Place the chicken breast into a 9x13 baking dish, and repeat for the remaining breasts.

5. Bake for 40 minutes uncovered. Serve hot.

Feta and Tomato Stuffed Chicken

Bo Bi Rice Paper Rolls

Rice Paper Rolls

The Bo Bi rice paper roll is a unique Chiu Chow/Vietnamese fusion dish that is commonly eaten by the Cantonese population who migrated to Vietnam. The name 'Bo Bi' is Chinese, and translates to 'thin pancake'. The original Chiu Chow Bo Bi dish uses a thin pancake instead of rice paper, but because rice paper is more commonly found in Vietnam, the Chinese who tried to re-create this dish started using rice paper out of convenience. The ingredients in the roll may vary depending on the family and their preferences.

I had Bo Bi rice paper rolls with my family the other night, and I instantly thought to snap pictures to share with everyone.

This dish is not very complicated to make, but there are many ingredients that need to be prepared. Here is the low down on how to make it.

1. Steam some Chinese sausages and slice them thinly.

Chinese Sausage
Sliced Chinese Sausages

2. Boil julienned carrots and turnips until tender and top it with fried onions. Be sure to make a large pot of this.

Carrots and Turnips
Boiled Carrots and Turnips

3. Roast some peanuts

Roasted Peanuts
Roasted Peanuts

4. Roast some preserved turnips and slice up a few fried eggs

Fried Egg and Preserved Turnip
Fried Eggs and Turnips

5. Wash some lettuce

Lettuce
Lettuce

6. Throw the above ingredients + dried rice paper on the dinner table. Get a big bowl of lukewarm water to dip your rice paper in. Give each person a big plate for wrapping, and away you go.

Bo Bi Ingredients

To make the wrap, dip the entire rice paper in lukewarm water for a few seconds, and set it on your plate. Place a bit of each ingredient in the middle of your rice paper.

Rice Paper Roll

Fold in the sides, and roll.

Rice Paper Roll

Voila! Once you have it, dip the roll into your favorite sauce. In my household, Sriracha hot sauce, hoisin sauce, and hot chilli oil are the most popular.

Rice Paper Roll

I mentioned above that some of the ingredients may vary from family to family. Other ingredients that could be used are jicama, dried prawns, and sauteed scallions. Of course, you can also try it the traditional way and use a thin pancake instead of rice paper.

Persian Spinach and Noodle Soup (Ash-e Reshteh)

Persian Spinach Noodle Soup

This spinach noodle soup is my secret weapon to staying healthy. When I'm not eating out, I make sure I eat damn well, and this soup is one of my default dishes. This soup is likely the first thing I make when I return from my travels. I make a huge honkin pot that will last me days, and this is how I 'detox' from my travels.

To some, this soup will look extremely unappetizing, but if you keep an open mind, you'll learn that it is delicious. What's best is that you get everything your body craves: protein, vegetables, fiber, carbohydrates...

I recently received an email from a reader asking for the recipe for this soup (after seeing this old post), so here it is. Good luck and I hope you enjoy this as much as I do.
This recipe yields 8-10 servings.

Persian Noodles

Persian Spinach and Noodle Soup (Ash-e Reshteh)
- 11 oz, 312g package of fresh baby spinach, roughly chopped
- 6 scallions, roughly chopped
- 2 cups of coriander, roughly chopped and loosely packed
- 2 Tbsp dried mint
- 10 cups of water, or broth of choice
- 1/3 cup of dried chickpeas
- 1/3 cup of dried red kidney beans
- 1/3 cup of dried navy beans
- 3/4 cup of dried green lentils
- 3 small onions, finely chopped
- 3 cloves of garlic, finely chopped
- 2 cups of dried Persian noodles (reshteh)
- 1 tsp of turmeric powder
- salt and pepper
- extra virgin olive oil

Method
1. Steam the chickpeas, kidney beans, and navy beans. To do this, boil 2 cups of salted water in a small pot. Turn off the heat, pour in the beans, and leave the lid on for at least 40 minutes. Drain excess water.

2. In a large pot, sautee the onions and garlic with extra virgin olive oil, turmeric, and a dash of salt. Add 10 cups of water (or broth), and bring to a boil. Add spinach, coriander, scallions, and mint. Simmer for 45 minutes

3. Add the steamed beans. Continue to simmer for 20 minutes. Add the dried lentils. Continue to simmer for 15 minutes. Add the noodles and simmer for an additional 15 minutes. Turn off the heat. Serve hot. If you feel your soup is not thick enough, sift some all purpose flour into the soup.

Persian Spinach Noodle Soup

Once you get comfortable with making this soup, you can go ahead and use any combination of greens and beans you want. For the greens, keep in mind that the majority should be spinach.

If you don't want to spend the time to prepare the dried beans, you can always used canned beans which takes a lot less time. If that is the case, add the beans near the end of the recipe so that they don't overcook.

Persians like to add a hint of sourness to this soup. An option is to stir in a bit of plain yogurt or whey right before serving.

Baked Blue Cheese Crab Cakes

Blue Cheese Crab Cake

While I was laying in bed one night, I thought to myself "ya know what, crab cakes would go really well with blue cheese".

Well, a few months later, I finally made it a reality. It took me a while but I finally did it. One warning to you though: please make sure you like blue cheese before you go and try this recipe. Blue cheese is an acquired taste, and it would be a shame to waste money and effort on these crab cakes to find out you don't really like blue cheese.

If you're not a blue cheese fan, go ahead and substitute for a cheese you do like. I'm sure it would be just as tasty.

Blue Cheese Crab Cake

This recipe yields about 10 crab cakes.

Baked Blue Cheese Crab Cakes
- 450g of lump crab meat
- 125g of a mild blue cheese, crumbled into small pieces
- 2 scallions, finely chopped
- 2 eggs, beaten
- 1 small red pepper, finely diced
- 1/2 cup of dried bread crumbs
- 1 Tbsp lemon juice
- 1 tsp old style grainy mustard
- 1 tsp of smoked paprika
- 1/4 tsp of cayenne pepper
- 1 Tbsp of vegetable oil
- dash of salt and pepper

Method
1. Preheat the oven to 375F/190C.

2. In a large mixing bowl, combine all of the ingredients and mix well. Line a baking sheet with parchment paper. With your hands, shape the crab mixture into hockey puck shapes (approximately 3 inch diameter and 1 inch thick).

3. Place the crab cakes onto the baking sheet, setting them approximately 1 inch apart. Bake for 20 minutes. Set aside until cheese hardens a little bit. Serve warm. To add a bit more taste and color, you can pan fry the crab cakes before serving. I didn't bother, to keep it on the healthier side, but I contemplated it.

Blue Cheese Crab Cake