Showing posts with label snack recipe. Show all posts

Recipe: Garlic Edamame

Garlic Edamame

A great healthy snack and tad more exciting than the traditional edamame sprinkled with sea salt, this garlic edamame will get you licking every pod you place in your mouth. It's quick to make and a really flavorful way to get your protein and fiber.

Garlic Edamame
- 2 cups of frozen edamame
- 4 cloves of garlic, roughly chopped
- 1/8 tsp red pepper flakes
- 1 tsp oyster sauce
- salt and pepper
- extra virgin olive oil

Method
1. On high heat, in an oiled pan, sautee the garlic for 1 minute. Add the frozen edamame red pepper flakes and a few dashes of salt and pepper. Cook on medium-high heat for 4-5 minutes, until the garlic is golden brown. Use a wooden spatula to stir the edamame around frequently.

2. Add the oyster sauce and toss until evenly coated, no more than 1 minute. Serve hot. Eat the beans only and discard the shell.

Baked Pita Chips

Baked Pita Chips

When my in-laws came to visit us in Sydney, they left behind so much pita break, we had no idea how to get rid of it. Our freezer was full of pita bread, and our little apartment size fridge was full of it too.

My hubby being a chip lover, I decided to make pita chips. I took out a bunch of spices, cut an overwhelming amount of pita bread, and made bags and bags of chips.
The recipe below calls for spices that I happened to use that particular day. Go ahead and mix whatever spices your heart desires.

Baked Pita Chips
- Pita Bread
- Cumin
- Garlic powder
- Sea salt
- Smoked paprika
- Cayenne pepper
- Extra virgin olive oil

Method
1. Pre-heat the oven to 350F/175C.

2. Using scissors, cut the pita bread in 2x2 inch squares.

3. In a mixing bowl, drizzle a generous amount of extra virgin olive oil over the pita bread. Mix well. Sprinkle cumin, garlic powder, sea salt, smoked paprika, and cayenne pepper over top of the pita bread. Mix until spices are evenly distributed.

4. Spread a think layer of the seasoned pita bread on a baking sheet. Bake for 10-12 minutes or until crispy.

Pumpkin Muffins with Cream Cheese Icing and Coconut

Pumpkin Muffin with Cream Cheese Icing and Coconut

Happy early Halloween everyone!

I made these pumpkin muffins a few days early JUST in case you were looking for that last minute pumpkin recipe before Halloween.

I'm sure some of you are pumpkin and apple'd out, but October is not over yet friends.
These pumpkin muffins are good for you, very filling, and full of spice. They are good for any occasion, and the cream cheese icing and shredded coconut add a very nice touch. I brought some for my sister and her boyfriend, and they each ate two on the spot.

I was in a festive mood, so I decorated a few with a Halloween theme.

Pumpkin Muffins with Coconut and Cream Cheese Icing

This recipe yields 16-18 muffins.

Pumpkin Muffins
- 1 cup of whole wheat pastry flour, sifted
- 1/2 cup of all purpose flour, sifted
- 1 cup of brown sugar
- 1 tsp of baking powder
- 1/2 tsp of baking soda
- 1 tsp of cinnamon
- 1/2 tsp of nutmeg
- 1/4 tsp of all spice
- 1/4 tsp of ground clove
- 1 cup of pumpkin puree
- 1/2 cup of milk
- 1 egg
- 1/3 cup of vegetable oil
- 1 tsp of vanilla extract
- 1/4 tsp fresh ginger, grated
- sweetened shredded coconut to garnish

Cream Cheese Icing- 1 (8oz, 250g) package of light cream cheese at room temperature
- 1/4 cup of butter at room temperature
- 1 cup of icing sugar
- 1/2 tsp of vanilla extract
- 1 vanilla pod

Method for Pumpkin Muffins with Cream Cheese Icing and Coconut

Make the Pumpkin Muffins:1. Preheat the oven to 350F/175C.

2. In one bowl, mix the flour, brown sugar, baking powder, baking soda, and dry spices together. In another bowl, mix the pumpkin, milk, egg, vegetable oil, vanilla extract, and ginger together. Add the wet ingredients to the dry ingredients, and mix well with a fork.

3. Line a muffin tray with baking cups. Spoon the muffin mixture into the baking cups until they are 3/4 full. Repeat until all the muffin mixture is used up.

4. Bake the muffins for 18-22 minutes. Remove from oven and set aside until they are fully cool.

Make the Cream Cheese Icing:
1. With an electric mixer on high speed, mix the butter and cream cheese until smooth.

2. Slowly add in the icing sugar while mixing.

3. Add the vanilla extract. Cut a vanilla pod in half, and scrape the vanilla seeds into the icing. Mix until evenly distributed.

Assemble the Muffin:
1. Using a butter knife, smear a thin layer of icing over top of the muffins.

2. Place the muffin on top of a plate, and sprinkle shredded coconut over top of the muffin until completely covered. Tip the muffin upside down to allow any loose coconut pieces to fall off.

Using low fat cream cheese for the icing will result in a slightly thinner consistency. If you want a think and creamy icing, it is best to use full fat cream cheese.

Here are some of the Halloween muffins I made:

Halloween Pumpkin Muffin

Halloween Muffin

Halloween Muffin

Halloween Muffin

For the next little while, you will have to excuse my posts. I have such a large backlog of travel posts, I'm not sure where to start and finish! I just got back from a short trip to Boston, so stay tuned for a mish mash of posts from Ottawa, Sydney, New Zealand, and Boston.

Cinnamon Apple Chips

Cinnamon Apple Chips

Fall is a great time for apple picking. I love apples because they are antioxidant, full of fiber, and they keep me full longer than any other fruit.

An easy and healthy snack I love to make is cinnamon apple chips. I make a big pile of these, and snack on them constantly. They are a small life saver after work. I'm always famished after a hard day at work, and instead of going for junk, I grab a few of these to keep me going until dinner is ready.

If you want crunchier chips, it is best to use firm apples such as Braeburn or Granny Smith. If you want spongier chips, go for apples such as McIntosh, Red Delicious, or Pink Lady.

Granny Smith Apple

Cinnamon Apple Chips
- apples, washed and cored
- cinnamon
- lemon juice

Method
1. Pre-heat the oven to 150F/65C.

2. Slice the apples thinly (approx 1/8 inch thick) with a mandolin. Cover a baking tray with parchment paper. Lay the apples on the baking tray leaving a small space in between each apple slice. Sprinkle a small amount of lemon juice and a small amount of cinnamon over the apple slices.

Dehydrating Apples

3. Turn off the oven, and place the baking tray of apples into the oven. Leave overnight. Apples should dehydrate completely, but if not, repeat the process until apples are completely dehydrated.

Cinnamon Apple Chips

My favorite types of apples for apple chips are Braeburn and Granny Smith. If I want to eat an apple raw, my favorite is the McIntosh hands down.

Apples from Pinewood Orchard, Ottawa
Apple Tree from Pinewood Orchards

Here are some apple orchards in the Ottawa & surrounding area:

Pinewood Orchards
101 Herzberg Road
Ottawa, Ontario, Canada
Telephone: 613-828-4412

AppleHill Fruit Farm
3699 ch. Jockvale Road
Ottawa, Ontario, Canada
Telephone: 613-786-1111 (in season)

Kilmarnock Orchard
1182 Kilmarnock Road
Jasper, Ontario, Canada
Telephone: 613-284-9843 (seasonal only)
Telephone: 613 283-8964 (off season)

Cannamore Orchard
1480 County Road 32
Crysler, Ontario, Canada
Telephone: 613-448-3633

Jasper Apple Farm and Organics
R.R. #2
Jasper, Ontario, Canada
Telephone: 613-283-8699

Smyth's Apple Orchard
R.R. #1
Iroquois, Ontario, Canada
Telephone: 613-652-2477

Here is a link to Apple Orchards Ontario.

Date Cake

Date Cake Slice

Five things that have gone obsolete:

1.) Cassette tapes and Walkmans (my favorite was my Color Me Badd tape)
2.) Black and white televisions
3.) Typewriters
4.) Poodle skirts
5.) Ready-made date cake mix

Number 5 is the reason for my post today. My aunt Mims loves date cake. She used to buy the ready-made date cake mix, and make it on a weekly basis. Our grocery stores stopped carrying it about 10 years ago, but she still reminisces about it from time to time. She never learned how to make it, so I decided to make it and bring her back to the good 'ol days.

This recipe yields 1 loaf.

Date Cake
Adapted from Sunshine Recipes
- 1 1/2 cups of chopped dates to which 1 cup of boiling water has been poured over
- 1 cup of brown sugar
- 1 1/3 cups of 7 grain flour (or a mixture of all purpose flour and 7 grain flour)
- 3/4 cup pecans, chopped
- 1 egg
- 1/4 cup of milk
- 1 Tbsp vegetable oil
- 1 tsp baking powder
- 1 tsp baking soda

Method
1. Preheat the oven to 350F/175C.

2. Cream together the sugar and oil. Add in the flour, baking powder, and baking soda. Add the dates with water, egg, and milk. Mix well. Stir in the pecans.

3. Grease a loaf pan (9x5x3 inches). Pour the batter into the loaf pan. Bake for 45-50 minutes. Remove the date cake from the pan, and let it cool on a cooling rack.

Date Cake

The Chip Maker: Microwaved Chips

Microwaved Chips
 
Believe it or not, the chips pictured above were made by microwave. Yes, like you, I thought it was a gross idea... until I tried them *blush*.

Wals' sister was recently in Taiwan, and bought him a "Chip Maker". Being too lazy to make his own chips, he figured I would make better use of the contraption. Being the food dork I am, I was excited by the gift, and ran home to use it.

In reality, this chip maker really isn't a chip maker. It is a mandoline + chip container that you can put in the microwave.

Chip Maker

Here's how this puppy works:

You slice your potatoes.

Chip Maker

Throw your potato slices, with some seasoning, onto the chip carousel.

Chip Maker

Microwave for 5-8 minutes, and ta da!

Chip Maker

I made regular potato chips and sweet potato chips, and both tasted good. These were the flavors I tried:

- sea salt and pepper (excellent).
- cayenne pepper and salt (not bad...they were spicy).
- Terriyaki (Wouldn't try this at home, stick to dry salty spices. I used a terriyaki marinade and the sugars completely burnt the chips).

Microwaved Chips

Healthy Banana Bread

Banana Bread

This is a super healthy banana bread recipe that my mom-in-law shared with me. As mentioned, she is the Queen of making healthy desserts that taste amazing. This is no exception. Every time I make this, my banana bread doesn't even last a day. It smells awesome when it first comes out of the oven, and tastes great when served warm. I love peeling off and eating the crunchy top of the loaf when it is still hot.

This recipe yields 1 loaf.

Healthy Banana Bread
- 1 cup of mashed ripe bananas
- 1 cup of sifted all purpose flour
- 1 cup of 9 grain flour (or whole wheat flour)
- 1/3 cup of milk
- 1/4 cup vegetable oil
- 2 eggs
- 1 cup sugar
- 1 tsp lemon juice
- 1/2 tsp salt
- 1 tsp baking soda
- 1/2 cup chopped walnuts, toasted

Method
1. Preheat the oven to 350F/175C

2. Sift the all purpose flour, baking soda, and salt into a bowl. Add in the whole grain flour and sugar.

3. Add in the oil, bananas, and eggs. Mix well.

4. Combine the milk and lemon juice, and stir until a uniform batter is formed. Stir in the walnuts.

5. Grease a loaf pan (9x5x3 inches). Pour the batter into the loaf pan.

6. Bake for 60 - 70 minutes. Note that the top of your loaf will brown before it is fully cooked. Remove banana bread from pan, let it cool on a cooling rack, and serve.

Orange and Nut Date Cups

The moment I was introduced to Persian food was the moment the world of natural and wholesome cooking opened up for me. These orange and nut date cups were inspired by the persian cooking and food that surrounds me. A lot of the times, dessert at my in-laws consists of dates and fresh fruit with tea. They are the healthiest people I know, and after being around them for long enough, it starts to rub off on you. I am now constantly looking for new ways to make healthy and natural meals.

I was craving something sweet yesterday, so I threw some of my favourite nuts along with some dates into a food processor, and created a great dessert out of it. I added some orange zest to make it more refreshing, and also threw in some rose water because I find it tastes great in desserts.

This recipe makes approximately 16 mini date cups.

Orange and Nut Date Cups
- 350g dates
- 1/2 cup toasted walnuts, chopped and crushed
- 1/4 cup toasted almonds, ground
- 1/4 cup toasted almonds, chopped and crushed
- 1/4 cup toasted macadamia nuts, chopped and crushed
- 1/4 cup toasted sesame seeds
- 2 tbsp freshly squeeezed orange juice
- 1 tbsp orange zest
- 2 tsp rose water
- 1 tsp ground flax seed

Instructions
1. Chop up and crush the dates and nuts into small pieces

2. Place all of the ingredients into a food processor and chop until it becomes a pasty date mixture

3. Place the date mixture into a mixing bowl, and continue to mix with a fork for a few minutes to ensure you mash up all of the date chunks

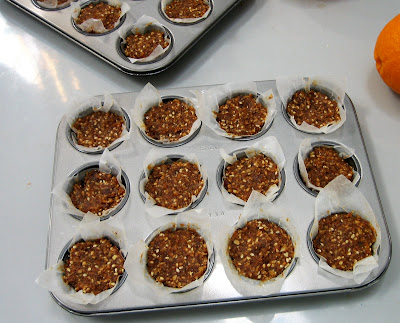
4. Line a mini muffin tin with wax paper. My muffin tins 2 inches in diameter, and 1 1/4 inches deep

5. Drop the date mixture into each muffin tin cup and fill it to the top

6. Press the date mixture tightly into the muffin tin cup with a small spoon

7. Cover each muffin tin cup filled with date mixture with wax paper

8. Refigerate for 2 hours and serve.

Keep the date cups in the refrigerator until you are ready to serve. When the mixture is left at room temperature for too long, it gets very soft. Right before serving, I dusted the date cups lightly with icing sugar, and garnished with grated orange peel.