Showing posts with label chicken. Show all posts

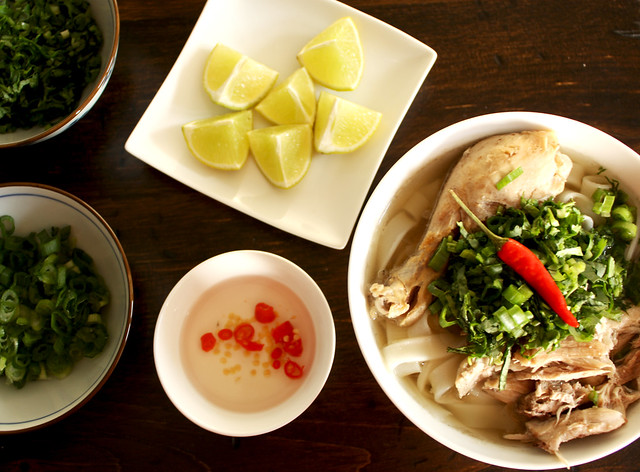
Recipe: Vietnamese Chicken Noodle Soup (Pho Ga)

Pho Ga (Chicken Noodle Soup)

My mom LOVES to buy whole chickens for me. The only problem is that she is a bit excessive with it. She will out of nowhere call me up, tell me she is dropping off a chicken for me, and then all of a sudden, 3 whole chickens will show up at my door. But, it doesn't stop there. The next day, another chicken will show up. And the next day, another chicken is dropped off. And it won't stop until you firmly tell her that enough is enough.

As much as I should be grateful for all of the gifted chickens, I kind of get to a point where I just don't have enough space to store them.

Needless to say, my freezer is always full of whole chickens, which is perfect for making broth. This Vietnamese Chicken Noodle Soup (pho ga) recipe is one that my mom gave me. While it seems complicated to make, it is in fact very easy. It does take some time to make, but you can pretty much go on auto-pilot once you have everything cooking in the pot.
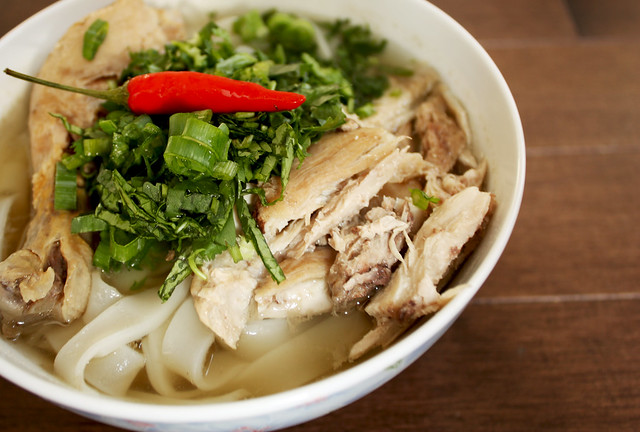
Pho Ga

Vietnamese Chicken Noodle Soup (Pho Ga)
- flat rice noodles, fresh or dried
Stock
- 1 whole free-range chicken (4-5 lbs), skin and excess fat removed
- water
- 1/4 tsp of salt
- 5-7 Tbsp fish sauce
- 3 star anise
- 4-5 large onions, peeled and cut in half
- 2-3 pieces of ginger, approx 2 inches long with skin peeled

Garnish (All optional)
- fresh cilantro, finely chopped
- fresh green onion, finely chopped
- white vinegar with chopped birds eye chilli
- fresh white onion, cut into thin slices
- birds eye chilli
- fresh lime, cut into small wedges
- white pepper
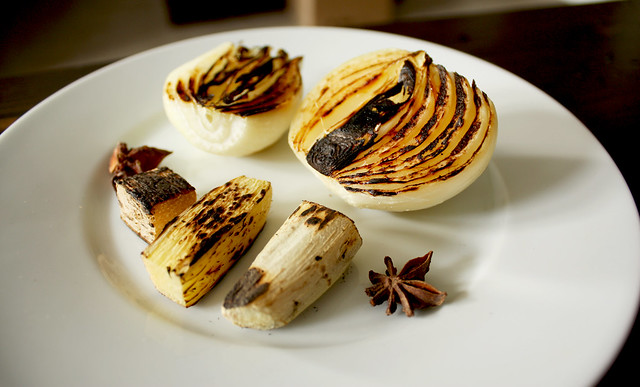
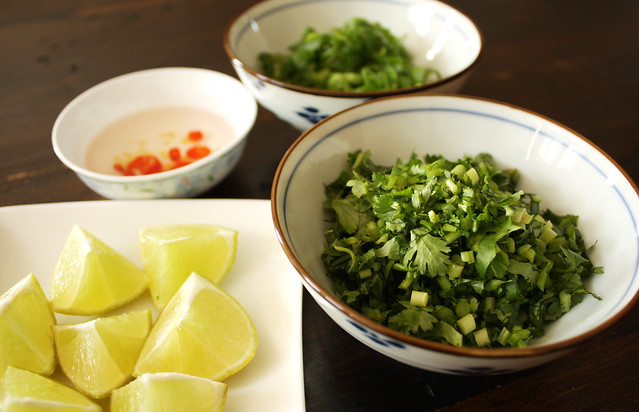
Charred Onion and Ginger

Garnish for Pho

Method
1. Char the onions and ginger on a bbq grill or stove top (on high heat) until all sides are charred. Approximately 1-3 minutes per side. Use tongs to rotate.

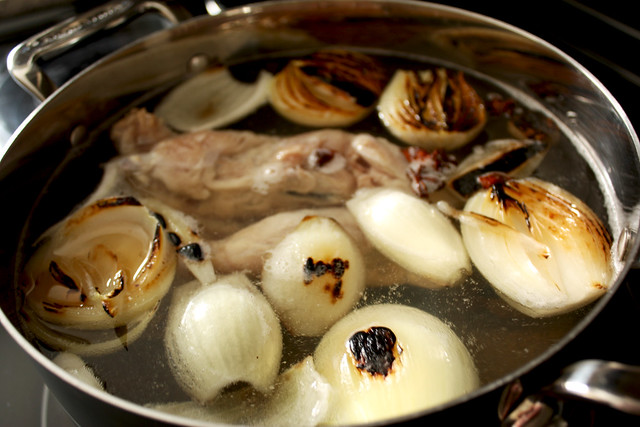
2. In a large pot (5.6L), fill 3/4 of the pot with water. Add the chicken, salt, onions, ginger and star anise, and bring to a boil. Turn the heat down to low and let it simmer for an hour. Add the fish sauce and let it simmer for another 1-2 hours. Technically, you are done once the chicken is cooked but the longer the better. I like to simmer my broth for a total of 3 hours. Add water as needed (the broth tends to evaporate while simmering).
Chicken Soup

3. Now you are ready to construct the soup and noodles. In a separate pot, cook the rice vermicelli noodles according to package instructions. If you are using dried rice vermicelli, it is best to soak the noodles in a large bowl of luke warm water for a few hours before cooking. This shortens the cooking time significantly.

4. Drain the noodles and place in a large soup bowl. Add hot broth over top of the noodles. Add chicken pieces and your garnishes of choice. Serve hot with a large soup spoon and chopsticks.

Recipe: Yellow Thai Chicken Curry with Potatoes (Gang Garee Gai)

Thai Yellow Curry

Yellow Thai chicken curry, seen as Gang Garee Gai or Kaeng Kari on English menus, is one of the most fragrant and hearty curries in Thai cuisine.

The essence of making Thai curries is to heat the thick creamy part of the coconut milk until the oil and milk separates, and then frying it with curry paste until it becomes fragrant. If you get this part right, the rest is simple. If the coconut milk does not split, it may be because emulsifiers were added to it. If this is the case, just fry the curry paste with coconut milk until it is fragrant. If you cook the curry long enough, the coconut milk will eventually split.

If you are not making your own curry paste, make sure you buy a good quality one, as this will make all the difference. A paste made in Thailand is your best bet. The Mae Ploy or Mae Sri brands are preferred.

Yellow curry paste is a combination of lemon grass, garlic, shallot, galangal, dried red chilli, corriander seed, kaffir lime peel, cumin, cinnamon, turmeric, and cardamom.

Yellow Thai Chicken Curry with Potatoes (Gang Garee Gai)
- 250mL - 400mL of coconut milk (I used 250mL. Using a bit more will make it creamier)
- 2 Tbsp yellow curry paste
- 1 pound of chicken
- 1 large onion, cut into 4 wedges
- 4 medium potatoes, peeled and cut into 2 inch pieces
- 2 cups of water
- 4-5 Tbsp fish sauce (start with 4 and add another if you want more taste)
- 1 tsp palm sugar

Method
1. In a large pot, heat the thick creamy part of the coconut milk (the part that rises to the top) until the oil and milk separates. Add the curry paste and fry until fragrant. Add in the rest of the coconut milk and chicken and cook for 1 minute. Add water, fish sauce and onions and simmer until the chicken is cooked. If using chicken thigh or legs, cooking time is approx 30 minutes. If using chicken breast only, cooking time will be slightly shorter.

2. Add the potatoes and simmer until potatoes are cooked, approximately 15 - 20 minutes. Stir in the palm sugar and mix well. Serve hot with Jasmine rice.

Recipe: Persian Chicken and Prune Stew (Khoresh Aloo)

Persian Prune Stew (Khoresh Aloo)

Persians have mastered the art of combining meat with fruit. Coming from someone who never really cared for the two together, I can tell you that Persians do it well and this dish is a prime example.

If you're squirming from the sound of prunes and chicken in stew form, let me try to describe it to you before you decide you're gonna hate it. The base is sweet, tangy and almost candy like. The chicken combined with the slow cooked onions, and some salt + pepper provide the savory elements needed to give it the sweet/salty phenomenon (but more on the sweet side). Serve this stew on a bed of fluffy basmati rice and you've got something that will satisfy your tastebuds in a totally different way.

This recipe calls for pomegranate paste, which is a thick molasses-like paste made of pomegranate concentrate. You can find this at your local Persian grocery/specialty store.

Persian Chicken and Prune Stew (Khoresh Aloo)
- 2 cups of prunes
- 1-2 chicken breasts, cut into 2.5 inch strips (depends on how much meat you want)
- 1 small onion, finely chopped
- 2 cups of water
- 2 Tbsp of pomegranate paste
- extra virgin olive oil
- salt and pepper to taste

Method
1. In an oiled pan, saute the onions until translucent (about 2-3 minutes). Add the  chicken and saute for 3 minutes until partially cooked and lightly brown on the outside.

2. Add the water and prunes. Bring the water to a boil and then simmer for 30 minutes, covered with the lid on. Add more water part way through if necessary. If the heat is too high, the water may evaporate.

3. While simmering, uncover the stew and with a spatula, mash up 1/4 of the prunes so that it helps form a thick sauce. Add 2 Tbsp of pomegranate sauce, salt and pepper to taste, and mix well. Turn off the heat and serve hot.

You can use any type of chicken you want. Feel free to use all dark meat or mix it with both white and dark. If you prefer a more meaty stew, go ahead and add more chicken to the recipe.

Feta, Tomato and Almond Stuffed Chicken

Feta and Tomato Stuffed Chicken

I've never been a huge fan of chicken. Always found the meat a little boring. I find it doesn't have enough taste to stand on its own, which in my books is bleh. It's rare for me to find a good chicken recipe, and when I do find one, I need to spread the good news!

The flavors from the almond, cheese, and herbs in this recipe really compliment the chicken. What I love most about this dish is that the chicken comes out juicy every time...never dry!

This recipe yields 4 servings.

Feta, Tomato and Almond Stuffed Chicken
- 4 large chicken breasts
- 6 slices of white bread, crust cut off
- 1/4 cup of almonds, crushed
- 90 grams of feta, crumbled
- 2 scallions, roughly chopped, green part only
- 4 sun dried tomatoes, roughly chopped
- salt and pepper
- 2-3 egg whites

Method
1. Pre-heat the oven to 350F/175C. Create a pocket in each chicken breast by slicing the thickest part of each breast lengthwise. Do not slice the breast all the way through. Leave about a 1/2 inch. Sprinkle salt and pepper on the inside and outside of each breast. Set aside.

2. In a food processor, pulse the bread, 1 Tbsp of crushed almonds, some salt + pepper for 30 seconds until even bread crumbs are formed. Place the bread crumbs onto a large plate.

3. In a mixing bowl, combine the feta, sun dried tomatoes, scallions, and the rest of the crushed almonds and mix well with a fork. Place the egg whites onto a large plate.

4. Stuff and bread the chicken breasts. Spoon 1/4 of the feta mixture into the pocket of the breast, cover the entire surface of the chicken breast with egg white, and then roll the breast into the bread crumbs until surface is covered. Place the chicken breast into a 9x13 baking dish, and repeat for the remaining breasts.

5. Bake for 40 minutes uncovered. Serve hot.

Feta and Tomato Stuffed Chicken

Grandma's Steamed Chicken and Shiitake Mushrooms

Steamed Chicken and Shiitake Mushrooms

This dish is hot diggity good! It's gotta be, it is my grandmother's recipe. She makes this every time she comes to Ottawa to visit, and this time, I took advantage of her time here, and asked her to teach me how to make it.

This is a light and healthy dish, and I never feel guilty eating it. The last time I had this, I ate until my stomach screamed for me to stop. I prefer this dish on the milder side. If you wish, you can add more flavor by increasing the amount of oyster sauce.

This recipe yields 4 servings.

Steamed Chicken and Shiitake Mushrooms
- 3 chicken thighs (approx 1.4 lbs, 0.65 kg)
- 8-10 dried shiitake mushrooms
- 3 1/2 tsp of corn starch
- 4 tsp of oyster sauce
- 1 tsp of soy sauce
- 3-4 Tbsp ginger, cut into matchsticks
- 2 tsp of extra virgin olive oil
- 1 tsp + 1/8 tsp of sesame oil

Method
1. Break the stems off the dried shiitake mushrooms, and discard the stems. Soak the shiitake mushrooms in lukewarm water for at least 2 hours. Wring the water out of the mushrooms, and slice them thinly (approx 1/8 inch thick).

2. Remove the excess fat from the chicken, and cut them into small pieces (approx the size of a small matchbox).

3. In a bowl, combine the chicken pieces, corn starch, soy sauce, and oyster sauce, and mix well. Add in 2 tsp of olive oil and 1 tsp of sesame oil, and continue mixing until the oil is evenly distributed. Finally, add in the shiitake mushrooms and ginger, and mix gently. Adding the mushrooms and ginger at the end will ensure that the two will not absorb too much oil.

4. Place the chicken mixture in a round dish that is approximately 9 inches in diameter and 1 inch high. Place the plate in a Chinese steaming basket, and steam for 20 minutes. Right before serving, add 1/8 tsp of sesame oil to the chicken, mix well, and serve.

The chicken releases a wonderful broth that tastes excellent when mixed with white sticky rice.

Steamed Chicken and Shiitake Mushrooms

Salade Olivier

Salade Olivier

My food journey started with this dish. I never used to cook much, and frankly, I didn't really enjoy it. It was about 5 years ago, at my in-laws' house, when I first tried Salade Olivier. I instantly fell in love, and felt compelled to learn how to make it. My mother-in-law did not make this salad much, and I couldn't fathom the fact that it would be months before I would taste it again. I wanted to eat this salad when I wanted, and as much as I wanted. What did I do? I asked my mother-in-law to teach me how to make it. I didn't care how labor intensive it was, I just wanted to learn how to make it.

My mother-in-law was such a joy to cook with that our so-called 'cooking classes' became a regular thing. Through the process, I learned to cook many traditional Persian dishes that utilized unfamiliar techniques and ingredients. This excited me. My time with my mother-in-law opened my eyes to their beautiful culture. More importantly, it was my husband's culture. I am so thankful that I got to spend that time with his mom because I finally understood him in a very personal and unspoken way.
From there, I not only saw food and cooking in a whole different light, but I began to appreciate different cultures for their traditional beauty.

Salade Olivier, also called Russian salad, was invented in the late 1800's by Lucien Olivier, then owner and chef of Moscow's popular Hermitage restaurant. Salade Olivier was considered a signature dish at the Hermitage restaurant, and the complexity of my recipe comes no where close to the original. I read on wiki that the original salad contained ingredients such as veal tongue, crayfish tails, and grouse.

Although this salad originated from Russia, it has become a traditional dish in other parts of the world such as Iran and the Ukraine.

This recipe yields 6-8 servings.

Salade Olivier
- 5 white potatoes
- 3 dill pickles
- 1 onion, halved
- 1 1/2 cup of green peas, frozen
- 3 carrots, peeled
- 1 chicken breast
- 3 eggs
- 4 Tbsp of white vinegar
- 4 Tbsp of light mayonnaise
- 1/2 tsp of turmeric
- salt and pepper

Method
1. In a small pot, simmer 2 cups of water with the chicken breast, onion, carrots, turmeric, and some salt for 45 minutes. Allow to cool, and discard the onion. Shred the chicken breast into small pieces with your hands. Cut the carrots into small cubes.

2. In another pot, boil the potatoes and eggs. Remove the eggs after 12 minutes. Remove the potatoes when tender. Crack the eggs, peel them, and cut into small pieces. Peel the potatoes when they have cooled. Cut the potatoes into small pieces.

3. In a small pot, cook the frozen peas according to package instructions. Cut the pickles into small cubes. In a large bowl, combine the potatoes, chicken, carrots, pickles, peas, and eggs.

Ingredients for Salade Olivier

4. In a separate bowl, prepare the dressing by whisking the mayonnaise and vinegar. Add salt and pepper to taste. Add the dressing to the potato salad, and mix well. Refrigerate for 2 hours before serving.

It may not seem as though there is enough dressing at first, but this salad does not need a lot of it. You can eat this salad plain or with bread. My choice is pita bread.

Salade Olivier with Pita Bread

Chicken Enchiladas with Salsa Verde

Chicken Enchiladas with Salsa Verde

Back in February when I lived in San Diego for the month, I watched the Food Network day and night. I was addicted. The shows on the American Food Network were different from the ones on the Canadian one, so it was neat to see the small cultural differences in the food shows. A lot of dishes and recipes on the American shows were latino influenced, and I finally learned who Paula Deen was (and discovered deep fried macaroni and cheese along the way)!

One show I really got into was Tyler's Ultimate. Tyler Florence explores traditional meals and teaches you the ULTIMATE way to make them. I adapted my Chicken Enchiladas with Salsa Verde from his show, and it was a rockin' meal. CK and I couldn't believe how awesome it was.

One thing to note is that Enchiladas are traditionally made of corn tortillas. This recipe uses flour tortillas. Use whatever suits your fancy.

When available, I prefer to use uncooked tortillas. I love watching them bubble as they cook, and they have a nice chewy fresh texture to them.

This recipe makes 6-8 enchiladas.

Chicken Enchiladas with Salsa Verde
(Adapted from Tyler Florence)
- 2 small onions, finely chopped
- 1/2 can (7 oz.) of chicken broth
- 2 garlic cloves, minced
- 1 chicken breast, cubed
- 1 jar (16 oz.) salsa verde (I used Pace salsa verde. The jalapenos and smoked Spanish paprika in this salsa added a nice flavor).
- 3 plum tomatoes, diced
- 1 cup of cilantro, chopped
- 6-8 uncooked flour tortillas
- 2 cups of cheddar and jack cheese blend
- Extra virgin olive oil
- salt and pepper to taste
- Guacamole to serve on the side

Method
1. On medium-high heat, cook the tortillas on an ungreased pan. Cook one side until the tortilla bubbles, flip it, and then cook for another 30-45 seconds. Set aside.

2. Preheat the oven to 350 degrees F.

3. Sautee the onions and garlic with a little bit of extra virgin olive oil until onions are translucent. Add the chicken, chicken stock, salt + pepper, and simmer until the chicken stock dehydrates. Turn off the heat and allow the chicken to cool. Shred the chicken with hands.

4. Fill the bottom of a large baking dish with a thin layer of salsa verde.

5. Construct the enchilada. Lightly coat both sides of the tortilla with salsa verde. Place a spoon of the chicken mixture onto the tortilla. Sprinkle some cheese, fresh tomatoes, and cilantro on top of the chicken mixture. Fold the tortilla over the filling, and roll the enchilada. Place it on the baking dish with the folded side down to prevent it from unrolling. Repeat until all enchiladas are constructed.

6. Pour the rest of the salsa verde evenly over the enchiladas. Sprinkle some tomatoes, cilantro, and the remaining cheese on top. Bake for 30 minutes uncovered. Remove from oven, turn off the heat. Garnish the enchiladas with more fresh tomatoes and cilantro. Serve with guacamole.

Chicken Enchiladas with Salsa Verde

I kept this dish fairly healthy by skipping out on the sour cream (which I luckily don't really like anyway), and by using the tomatoes and cilantro as a main ingredient instead of a garnish.

Chicken Enchiladas with Salsa Verde

Crispy Gnocchi with Spinach and Ricotta

IMG_0717 copy

I was craving spinach and ricotta yesterday. One thing that my family always told me was that if you are craving something, your body needs it and lacks it.

So it made me think...when I was also craving chips and pizza smothered with grease yesterday, was it my body trying to tell me something or if it was it simply my lack of self control? I’d like to think it was my body needing some essential nutrient that is only found in chips and pizza, but I somehow doubt that.

The natural partner for spinach and ricotta is pasta. In absence of chips, I decided to make my pasta crispy. I pan fried some gnocchi, and it worked out great. A perfect substitute. Ok, not a perfect substitute, but a darn creative one.

This dish may look heavy, but it is in fact quite light. I drizzled a bit of lemon juice on top and the citrus juice added a nice touch. CK loved it, and even claimed it as his best meal in SD so far! There is nothing better than your hubby being completely satisfied from a meal that you cooked.
Depending on whether or not you use it as a main dish, this recipe serves 2-4.

Crispy Gnocchi with Spinach and Ricotta
- 1 Tbsp of fresh marjoram
- Light ricotta cheese
- 1 (10 oz) package of frozen chopped spinach, defrosted and drained
- 1 regular size chicken breast (optional)
- 2 small onions, chopped finely
- 1 clove garlic, minced
- Salt and pepper to taste
- Red pepper flakes
- Extra virgin olive oil
- 1 (16oz) package of gnocchi
- lemon juice
- parmesan cheese, grated
- red pepper flakes

Directions:
1. Cut the chicken into cubes or in any size and shape you want.

2. Season the chicken with a few pinches of salt and pepper. Mix well so that the salt and pepper is distributed evenly.

3. Heat a little bit of extra virgin olive oil in a pan on high heat.

4. Over medium heat, cook the onions until slightly caramelized (approximately 5 minutes).

5. Add in the garlic and ½ Tbsp of fresh marjoram, and cook for another 1 minute.

6. Add in the chicken and cook until chicken is fully cooked. The chicken should be a little brown on the outside.

7. Add in the spinach, ½ Tbsp of fresh marjoram, ½ tsp of red pepper flakes, and salt and pepper to taste. Cook for another 7-10 minutes until the spinach is heated.

8. When the spinach is heated, turn off the heat and spoon in the ricotta cheese until you get the consistency you like. This will depend on how creamy you like it. I used about 4 large tablespoons. Transfer the spinach and ricotta mixture into a bowl.

9. Clean the pan well, and heat about 1 tsp of extra virgin olive oil on high heat. If you have two pans, you can start making the gnocchi while you are heating the spinach (step 7).

10. Turn the heat down to medium high, and add in the gnocchi. Add just enough gnocchi so that it creates a single layer. Do not fill your pan so much that the pasta is piled on top of each other.

Crispy Gnocchi

11. When one side of the gnocchi is crispy and brown, flip it over and cook the other side (About 3-5 minutes on each side). The crispy gnocchi should not taste greasy at all.

12. Remove the gnocchi from the pan, and transfer onto plates.

13. Spoon the spinach and ricotta mixture on top of the gnocchi.

For final touches, squeeze a bit of lemon juice on top, and sprinkle grated Parmesan cheese and red pepper flakes.